

10 Eco-Friendly Pantry Storage Ideas for 2025
Transforming your pantry from a cluttered space into an organized, functional, and beautiful area is more than just an aesthetic upgrade; it's a commitment to a sustainable, plastic-free lifestyle. An efficient pantry system not only saves you time and reduces food waste but also aligns with a conscious effort to minimize environmental impact. Moving away from single-use packaging and embracing durable, reusable solutions is a powerful step towards a zero-waste kitchen.
This guide provides a comprehensive collection of practical and actionable pantry storage ideas designed to help you achieve this goal. We will explore ten distinct, eco-conscious organizational systems that prioritize visibility, accessibility, and longevity. Forget temporary fixes and generic advice; you'll find specific strategies for implementing everything from clear glass container systems and innovative pull-out drawers to space-saving vertical dividers and magnetic spice racks. Each idea is presented with clear implementation details, ensuring you can immediately apply these concepts to create a streamlined, sustainable pantry. Let's get started on building a kitchen hub that is as good for the planet as it is for your peace of mind.
1. Embrace the Glass Jar Revolution: The Ultimate Plastic-Free System
Transitioning away from plastic packaging is a cornerstone of a sustainable kitchen, and glass jars offer the most effective and aesthetically pleasing solution. This system involves decanting all your dry goods, from grains and pastas to nuts and spices, into clear glass containers. This isn't just about looks; it's a functional strategy that transforms your pantry into a highly efficient, zero-waste hub.
How to Implement a Glass Jar System
Creating a uniform glass jar system is one of the most impactful pantry storage ideas for visual clarity and food preservation. Start by collecting jars. You can purchase matching sets or, for a more budget-friendly approach, upcycle glass jars from products like pasta sauce, pickles, and jams. Soaking them in hot, soapy water and a little vinegar easily removes old labels and any lingering odors.
For successful implementation, consider these steps:
- Standardize Lid Sizes: If buying new, try to stick to one or two standard lid sizes (like regular or wide-mouth Mason jars). This makes finding a matching lid effortless.
- Label Strategically: Use a wax pencil, erasable chalk marker, or a simple label maker to mark the contents and, crucially, the expiration or purchase date on the bottom or back of the jar. This keeps the forward-facing view clean and minimalist.
- Organize by Use: Group similar items. Place everyday grains like rice and quinoa at eye level, while baking supplies like different flours and sugars can occupy a dedicated shelf.
Pro-Tip: Take your empty, pre-weighed jars to a bulk-bin store. This allows you to refill them directly, completely eliminating packaging waste from your shopping trip. Simply have the cashier tare (zero out) the weight of your empty jar before you fill it. This practice is the heart of a truly naked pantry.
2. Install Pull-Out Drawers: Eradicate Dead-Corner Clutter
Deep pantry shelves often create "dead zones" where items get lost and forgotten, leading to food waste and duplicate purchases. Pull-out drawer systems are a game-changing retrofit that transforms static shelving into dynamic, accessible storage. By installing sliding drawers, you bring the back of the pantry to you, ensuring every can, box, and bottle is visible and within easy reach.
This solution is one of the most functional pantry storage ideas for maximizing existing space and improving accessibility, particularly in deep or narrow cabinets. It allows for a more organized, efficient system where you can see your entire inventory with a simple pull.
How to Implement a Pull-Out Drawer System
Retrofitting your pantry with sliding drawers is a high-impact upgrade. Brands like Rev-A-Shelf and Blum offer high-quality hardware systems, but custom solutions are also an option. Careful planning is key to a successful installation that will last for years.
Follow these steps for a seamless integration:
- Measure Meticulously: Accurately measure the interior width, depth, and height of your cabinet. Account for any obstructions like door hinges or interior lips that could block the drawer's path.
- Consider Weight Capacity: Choose drawer slides rated to handle the weight of your items. Heavy canned goods, bulk bags of flour, or small appliances require heavy-duty slides for safe and smooth operation.
- Plan Drawer Heights: Customize drawer heights based on what you plan to store. Use shorter drawers for spices and cans, and deeper ones for tall bottles, cereal boxes, or stacked containers.
Pro-Tip: Before committing to a full installation, use cardboard mock-ups to test your drawer layout. This helps you visualize how items will fit and ensures your planned heights and depths are practical for your specific storage needs, preventing costly mistakes.
3. Maximize Vertical Space with Door-Mounted Rack Organization
The back of your pantry door is one of the most underutilized spaces in a kitchen, representing prime real estate for storage. By installing a door-mounted rack system, you can transform this blank surface into a highly functional storage zone for spices, oils, condiments, and other small items. This approach is especially valuable in galley kitchens or smaller pantries where shelf space is at a premium, instantly expanding your storage capacity without a major renovation.
How to Implement a Door-Mounted System
Adding a door rack is one of the most effective pantry storage ideas for decluttering shelves and improving access to frequently used goods. From simple wire racks to modular systems like Elfa, options exist for every budget and door type.
For successful implementation, consider these steps:
- Check Door Integrity: Before purchasing, ensure your door is solid core and can handle the weight. Hollow-core doors may require special anchors or are better suited for lightweight items only.
- Plan Your Layout: Arrange items so that taller bottles are on the bottom and smaller spice jars are near the top. This distributes weight more evenly and keeps everything stable.
- Ensure Proper Clearance: Load the rack and test that the door can still close completely without the rack's contents hitting your pantry shelves. Adjust shelf depths if necessary.
Pro-Tip: Use clear containers or decant spices and oils into uniform bottles for your door rack. This not only creates a clean, organized look but also allows you to see exactly what you have at a glance, preventing you from buying duplicates. This is a game-changer for managing small-inventory items.
4. Spin to Win with Lazy Susan Turntables
Deep pantry corners and high shelves often become black holes where jars of spices and cans of food go to expire. The Lazy Susan, a simple rotating turntable, is a classic organizational tool that solves this problem brilliantly. By placing one in a hard-to-reach corner or on a deep shelf, you make every single item accessible with a gentle spin, eliminating the need to dig past front-row items.
How to Implement Lazy Susan Turntables
Integrating turntables is one of the most effective pantry storage ideas for maximizing awkward spaces and preventing food waste. They are especially useful for corralling smaller items like spice jars, oils, vinegars, and condiments that can easily get lost.
For successful implementation, consider these steps:
- Measure First: Before buying, accurately measure the depth and width of your shelf or corner cabinet. Leave a little clearance on all sides to ensure it can spin freely without hitting the walls or door.
- Contain and Group: To prevent items from toppling over, use turntables with a raised lip or place smaller containers on top of the turntable. Group similar items together, like all your baking extracts or various hot sauces.
- Distribute Weight Evenly: For a smooth, stable rotation, balance the weight of your items. Place heavier cans or jars opposite each other rather than clustered on one side. This is crucial for two-tier models.
Pro-Tip: Use clear, pie-shaped organizers on your Lazy Susan. These wedge-like bins fit perfectly on a round turntable, creating designated zones for different categories. This keeps everything upright and perfectly segmented, transforming a chaotic corner into a model of efficiency.
5. Implement Smart Wire Basket Systems for Breathable Storage
For pantry items that need to breathe, such as root vegetables like potatoes and onions, a sealed container is the enemy. Wire basket systems provide the perfect solution, promoting essential air circulation that significantly extends the life of your produce. These ventilated metal baskets, often stackable or designed as pull-out drawers, prevent moisture buildup and inhibit premature sprouting and spoilage, making them a cornerstone of a functional, farm-to-table kitchen.
How to Implement a Wire Basket System
Integrating wire baskets is one of the most effective pantry storage ideas for managing fresh produce and bulky items. You can choose from freestanding towers, under-shelf pull-out units, or simple stackable bins. The open design allows you to see contents at a glance, ensuring nothing gets lost or forgotten at the back of a dark shelf.
For successful implementation, consider these steps:
- Choose the Right Type: Select stackable baskets for vertical space efficiency or sliding units for easy access in deep cabinets. Coated wire is preferable to prevent rust and protect your pantry shelves from scratches.
- Organize by Category: Dedicate specific baskets to different items. For example, one for potatoes, another for onions (stored separately to prevent flavor transfer), and one for garlic and shallots. Labeling each basket helps the whole family maintain the system.
- Use Liners for Small Items: To store smaller items like loose garlic cloves or prevent debris from falling through, place a reusable, washable liner at the bottom of the basket. This makes cleanup quick and simple.
Pro-Tip: Position your wire basket system in the coolest, darkest, and driest part of your pantry. This mimics the conditions of a traditional root cellar, maximizing the freshness of your produce and reducing food waste. Avoid placing them near appliances that generate heat.
6. Adjustable Shelf Risers and Stackers: Double Your Vertical Space
Many pantries suffer from wasted vertical space, with tall shelves leaving a large gap above shorter items like cans, spice jars, and small boxes. Adjustable shelf risers and stackers are ingenious tools that instantly solve this problem by creating multi-level storage on a single shelf. This strategy is less about a full aesthetic overhaul and more about maximizing pure functionality, especially in pantries where space is at a premium.
How to Implement Shelf Risers and Stackers
Using risers is one of the most immediate and impactful pantry storage ideas for gaining usable surface area without any permanent installation. These simple accessories, often made of wire, wood, or acrylic, can effectively double the storage capacity of a shelf. They are perfect for small apartment kitchens, RVs, or any pantry with fixed, non-adjustable shelving.
For successful implementation, consider these steps:
- Measure First: Before purchasing, measure the width, depth, and height of your shelves to ensure a good fit. Many risers are expandable, offering flexibility for different cabinet sizes.
- Assign by Weight: Place heavier items like canned goods or bulk jars on the main shelf surface and use the riser for lighter items like boxed teas, spices, or smaller containers. This ensures stability.
- Create Zones: Use risers to visually separate categories. For instance, place all your canned beans on the bottom level and canned tomatoes on the riser above, making it easy to see your inventory at a glance.
Pro-Tip: Combine shelf risers with uniform containers for a clean, cohesive look. Placing identically sized glass jars or canisters on both the lower and upper levels of a riser creates an organized appearance that looks intentional and tidy, rather than cluttered. This blend of function and form elevates a simple space-saving hack into a sophisticated organizational system.
7. Maximize Cabinet Space with Vertical Divider Systems
Flat, awkward items like baking sheets, cutting boards, and serving platters often end up in a noisy, hard-to-access pile. A vertical divider system solves this problem by transforming cluttered horizontal stacks into neat, vertical files. This method, inspired by professional bakery and restaurant kitchens, maximizes the efficiency of deep cabinets and makes every single item easily reachable without unstacking the entire pile.
How to Implement a Vertical Divider System
Installing vertical dividers is one of the most effective pantry storage ideas for taming unruly flatware and bakeware. These systems create designated slots, allowing you to slide items in and out effortlessly. You can find ready-made solutions or build your own for a custom fit.
For successful implementation, follow these steps:
- Choose Your System: Options range from simple tension rods to adjustable wire racks like the YouCopia StoreMore, or custom-built plywood partitions. Select a system that fits your cabinet dimensions and the weight of your items.
- Measure and Plan: Before installing, measure your largest item (like a big cutting board or serving platter) to ensure the spacing between dividers is adequate. Adjustable systems offer the most flexibility for future needs.
- Install for Stability: Secure the dividers firmly. For heavier items like stone baking sheets or cast-iron griddles, ensure the system is robust. Placing non-slip liners on the cabinet base will prevent items from sliding forward.
Pro-Tip: Install vertical dividers in a lower cabinet or a deep pantry drawer. The pull-out motion makes it incredibly easy to see all your items at a glance and grab what you need without bending down and rummaging through a dark, deep cabinet.
8. Go Vertical with Magnetic Spice Storage
When shelf and drawer space is at a premium, thinking vertically is a game-changer. A magnetic spice storage system frees up prime real estate by moving your entire spice collection to an unused vertical surface, like the side of your refrigerator, a metal pantry door, or a dedicated magnetic board mounted on the wall. This approach keeps spices highly visible and instantly accessible, ending the frustrating search for that one hidden jar.
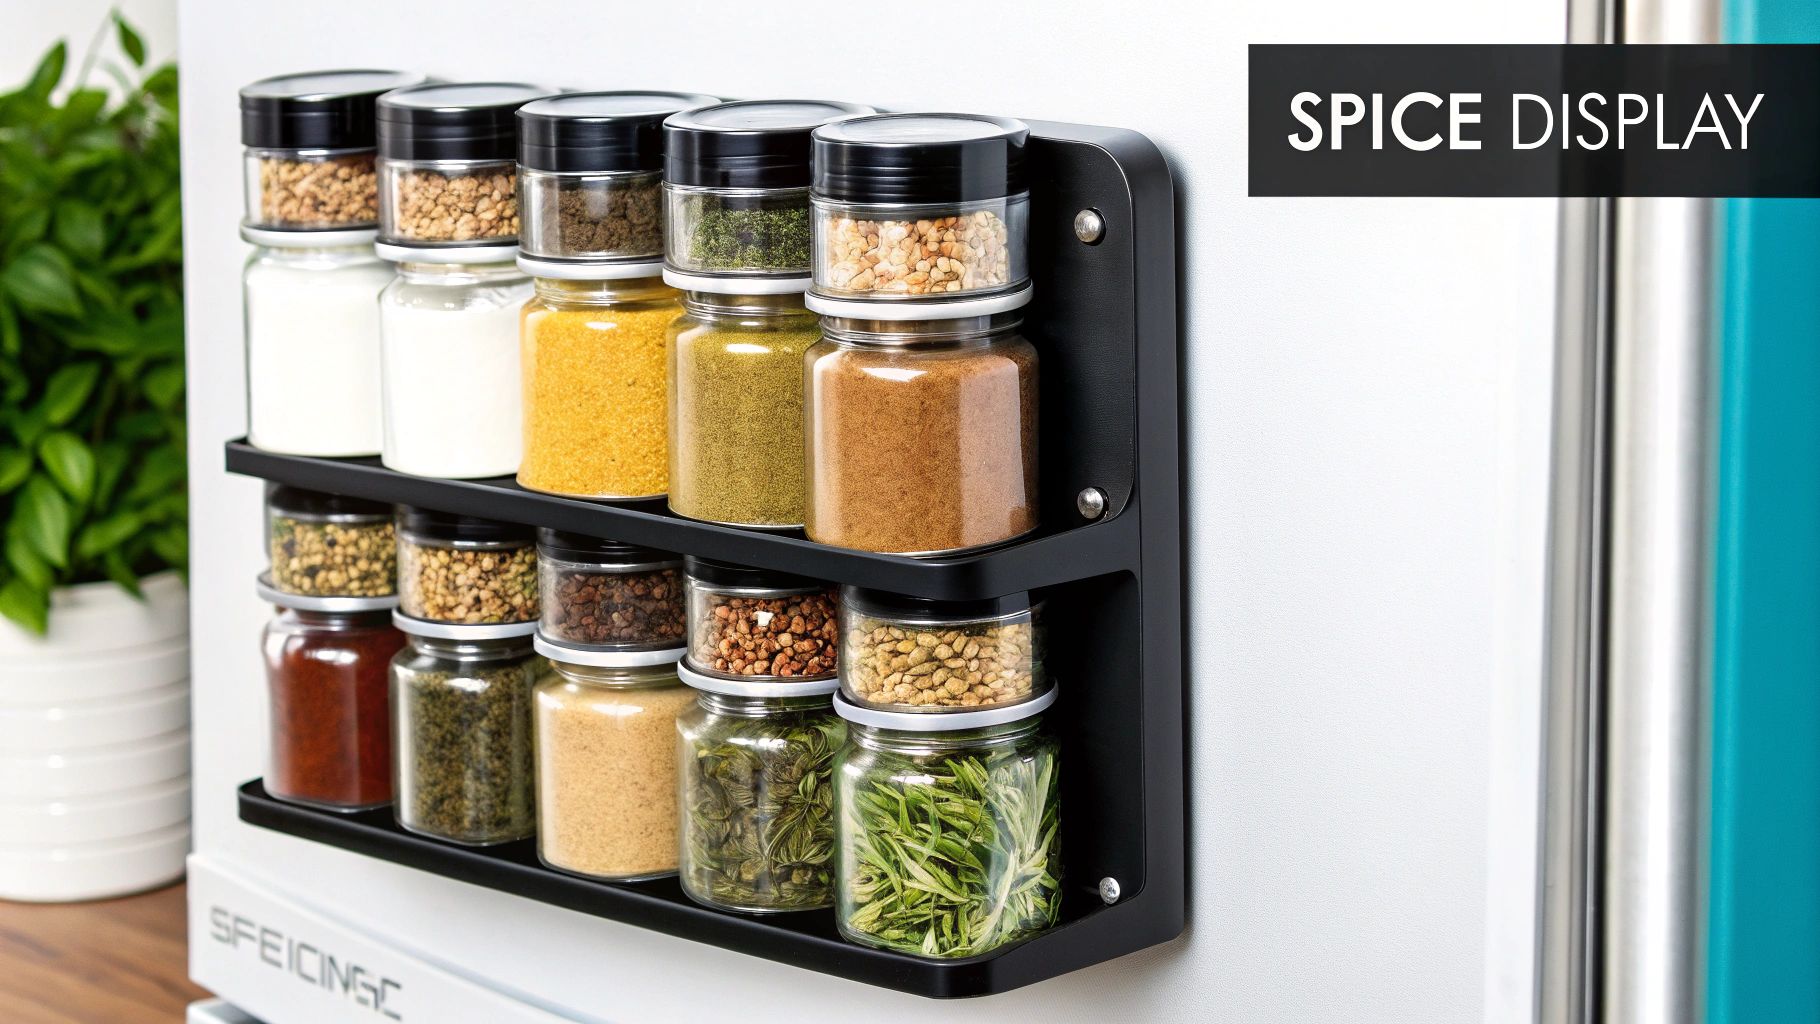
This method is one of the most effective pantry storage ideas for small spaces, from modern apartment kitchens to RVs where every inch counts. It turns a blank surface into a functional and often beautiful feature.
How to Implement a Magnetic Spice System
Setting up your magnetic spice wall is straightforward and can be customized to your kitchen's aesthetic. You can purchase ready-made systems like the popular Gneiss Spice jars or create your own DIY version.
For successful implementation, consider these steps:
- Choose Your Containers: Select small, uniform containers with strong magnets. Hexagonal jars create a visually appealing honeycomb pattern, while round tins offer a classic look. Ensure the magnets are powerful enough to hold the weight of the filled jar.
- Label for Clarity: Clear labeling is essential for quick identification. Use a permanent marker or pre-printed labels on the lids so you can see every spice at a glance.
- Organize Intuitively: Arrange your spices for maximum efficiency. You could organize them alphabetically, by frequency of use with everyday spices at eye level, or even by color for a creative visual effect.
Pro-Tip: Before committing to a full setup, test the chosen location. Avoid placing heat-sensitive spices directly next to a heat source like the oven or in direct, prolonged sunlight, as this can degrade their flavor and potency over time. The side of a refrigerator away from the stovetop is often an ideal spot.
9. Automate Stock Rotation with Tiered Can Dispensers
Canned goods are pantry staples, but managing them can lead to a chaotic jumble where older items get lost in the back. Tiered can dispensers solve this by creating an automated first-in, first-out (FIFO) system. These organizers use gravity or angled steps to ensure that as you remove one can, the next one rolls forward, making it easy to see and access your entire stock.
This method is one of the most effective pantry storage ideas for anyone who buys canned goods in bulk, from families managing Costco hauls to those focused on long-term emergency preparedness. It prevents food waste by ensuring you always use the oldest items first.
How to Implement a Can Dispenser System
Integrating a can dispenser streamlines inventory management and maximizes vertical space. These systems range from simple plastic or wire-frame stepped shelves to more advanced gravity-fed racks.
For successful implementation, consider these steps:
- Group and Load: Before loading, sort your cans by type (e.g., beans, tomatoes, soups) and size. This makes finding what you need quick and prevents smaller cans from getting stuck behind larger ones.
- Measure First: Check the dimensions of both your shelf space and the cans you typically buy. Ensure the dispenser you choose can accommodate them properly to allow for smooth rolling.
- Position for Access: Place the dispenser at a comfortable height, ideally between your waist and shoulder. This makes it easy to load new cans at the top and retrieve them from the bottom without straining.
Pro-Tip: For large collections, consider using several smaller, modular dispensers rather than one massive unit. This allows for better organization by category (vegetables in one, fruits in another) and offers more flexibility if you decide to rearrange your pantry layout later. It also makes cleaning easier.
10. Maximize Verticality with Multi-Level Hanging Baskets
When shelf space is exhausted, the only way to go is up. Multi-level hanging baskets are a brilliant solution for tapping into the unused vertical real estate in your pantry, especially in rooms with high ceilings. This traditional storage method, popularized by farmhouse aesthetics and practical produce-keeping, creates new storage out of thin air without cluttering your existing shelves.
How to Implement Hanging Basket Storage
Hanging baskets introduce dynamic, accessible storage and are one of the most clever pantry storage ideas for making a small space feel larger and more functional. They are perfect for lighter-weight items that you want to keep visible and within easy reach.
To hang your baskets effectively, follow these guidelines:
- Secure Your Anchor: The most critical step is safety. Ensure you anchor the hook into a ceiling joist or use a heavy-duty toggle bolt designed for drywall. Always check the weight capacity of your hardware and the baskets themselves.
- Designate by Tier: Use the tiers strategically. The top, least accessible basket can hold backstock items like paper towels or extra bags. Middle tiers are ideal for produce like onions, garlic, and potatoes that benefit from air circulation, while the lowest tier can hold kid-friendly snacks.
- Choose Your Material: Match the basket material to your kitchen's style. Woven wicker or jute baskets lend a warm, rustic feel, while wire baskets offer a more industrial or modern farmhouse look.
Pro-Tip: Don't limit hanging baskets to just the pantry. They work wonders in a garage for storing rags and supplies, in a root cellar for produce, or even in an outdoor kitchen for holding grilling tools and fresh herbs. It's a versatile system that adapts to your needs.
Top 10 Pantry Storage Solutions Comparison
| Item | Implementation Complexity 🔄 | Resource Requirements ⚡ | Expected Outcomes 📊 | Ideal Use Cases 💡 | Key Advantages ⭐ |
|---|---|---|---|---|---|
| Clear Storage Containers System | Medium - requires time for transferring and labeling | Moderate - upfront cost for quality containers | High - extends freshness, reduces waste, visible contents | Bulk buyers, aesthetics-focused, freshness seekers | Freshness preservation, visibility, space efficiency |
| Pull-Out Drawer Systems | High - professional installation recommended | High - costly per drawer system | High - full access, organized zones | Kitchen renovations, accessibility needs | Accessibility, organized storage, mobility friendly |
| Door-Mounted Rack Organization | Low - easy to install, often tool-free | Low - inexpensive materials | Medium - increases access to small, frequently used items | Small pantries, apartments, lightweight storage | Space-efficient, inexpensive, easily reconfigurable |
| Lazy Susan Turntables | Medium - simple installation | Low to moderate - affordable | Medium - improves corner access and visibility | Corner cabinets, deep shelves, accessibility | Maximizes awkward spaces, easy access |
| Wire Basket Storage Systems | Medium - may require installation | Moderate - durable metal baskets | Medium - promotes air circulation, durability | Produce storage, ventilated food items | Air circulation, durability, easy cleaning |
| Adjustable Shelf Risers and Stackers | Low - simple assembly without tools | Low - cost-effective | Medium - doubles shelf capacity, better visibility | Renters, small spaces, flexible storage needs | Inexpensive, easy reconfiguration, space doubling |
| Vertical Divider Systems | Medium - adjustable installation | Low to moderate | Medium - organized flat item storage | Baking sheets, cutting boards, platters | Prevents damage, maximizes vertical space |
| Magnetic Spice Storage | Low - requires magnetic surfaces | Low to moderate - investment in containers | Medium - visible, space-saving spice organization | Small kitchens, visible spice display | Space-saving, attractive display, easy access |
| Tiered Can Dispensers | Medium - requires sorting and sizing | Moderate - cost varies by size and capacity | High - FIFO stock rotation, reduces waste | Bulk can storage, emergency prepping | Inventory management, space-saving, waste reduction |
| Multi-Level Hanging Baskets | Medium - secure ceiling mounting required | Low to moderate - varies with materials | Medium - maximizes vertical unused space | Pantries with high ceilings, lightweight produce | Vertical space use, easy access, rustic appeal |
Your Pantry, Your Planet: A Commitment to Conscious Living
Transforming your pantry from a space of clutter into a sanctuary of organization is more than just a home improvement project; it's a powerful act of conscious living. Throughout this guide, we've explored ten dynamic, eco-friendly pantry storage ideas designed not only to maximize your space but also to align your daily routines with a commitment to sustainability. By moving beyond single-use plastics and embracing durable, reusable solutions, you actively reduce waste and create a healthier environment, both inside your home and for the planet.
We've seen how systems like clear glass containers and tiered can dispensers do more than just organize; they provide immediate visual inventory, preventing duplicate purchases and minimizing food waste. Similarly, implementing pull-out drawers and Lazy Susan turntables makes every item accessible, ensuring older products are used first. This "first in, first out" method is a cornerstone of a zero-waste kitchen.
Key Takeaways for a Sustainable Pantry
The journey to an organized, eco-conscious pantry is built on a few core principles we've covered:
- Visibility is Key: When you can see what you have, you use what you have. Clear containers, tiered shelves, and accessible baskets are your best tools against forgotten food.
- Maximize Every Inch: Vertical space is often overlooked. Door-mounted racks, hanging baskets, and shelf risers effectively double your storage capacity without a major renovation.
- Durability Over Disposability: Investing in high-quality, non-plastic solutions like glass, metal, and sustainable wood is an investment in your health and the planet's future. These materials don't leach chemicals and will serve you for years to come.
Your Actionable Next Steps
Feeling inspired? The best way to start is small. Don't feel pressured to overhaul your entire pantry overnight. Instead, choose one or two pantry storage ideas from this list that resonate with you and address your biggest organizational challenge.
- Conduct a Pantry Audit: Begin by taking everything out. This allows you to declutter, check expiration dates, and get a true understanding of the space you have.
- Select Your Starting System: Is your spice collection chaotic? Start with magnetic tins. Are canned goods getting lost in the back? A can dispenser is your solution.
- Source Mindfully: As you acquire new storage items, prioritize sustainable materials. Look for bamboo, recycled glass, or stainless steel to build a pantry that is as beautiful as it is responsible.
By embracing these strategies, you are not just organizing shelves; you are curating a lifestyle. An organized pantry simplifies meal planning, reduces stress, and empowers healthier, more intentional food choices. It becomes the functional heart of your home, reflecting a deeper dedication to wellness, efficiency, and environmental stewardship. Every jar you fill and every shelf you arrange is a step toward a more streamlined, sustainable, and fulfilling life.
Ready to stock your newly organized shelves with high-quality, organic, and plastic-free staples? Naked Pantry is your partner in building a truly sustainable kitchen, offering a wide array of goods that perfectly complement your new eco-friendly pantry storage ideas. Visit Naked Pantry to explore our selection and take the next step in your conscious living journey.